Mastering Screenshots: Your Ultimate Guide on How to Screenshot on Mac
Need help with how to screenshot on Mac? Worry no more! Mastering Mac screenshot shortcuts and tools can save time, improve workflow, and enhance communication. This ultimate guide will walk you through all the essentials and advanced tips, from basic keyboard shortcuts to third-party apps that offer extra functionality. Let’s unlock the true potential of how to screenshot on Mac!
Key Takeaways
- Master essential keyboard shortcuts to take Mac screenshots like a pro!
- Access the screenshot menu quickly and easily for versatile capture options.
- Leverage third-party apps, annotation tools, and troubleshooting tips for perfect Mac screenshots.
Essential Keyboard Shortcuts for Mac Screenshots

Are you aware that with some easy-to-remember keyboard shortcuts, taking screenshots on your Mac can be an effortless process? These simple steps will have you quickly shooting images as a pro.
Full Screen Capture: Shift + Command + 3
Taking a snapshot of your Mac’s entire screen is extremely easy with the built-in “screenshot” capability, using an all-encompassing capture. Just press the button. Shift + Command + 3, and you’re done. Your display will be grabbed in full resolution as a PNG image saved to the desktop by default – no need to go through any menus or set preferences; just hit that keyboard shortcut!
Selected Area Screenshot: Shift + Command + 4
The Shift + Command + 4 shortcut will enable you to capture a specific portion of your screen. Doing so transforms your mouse pointer into a crosshair, allowing you to drag and select areas with the help of the mouse button. If required, selection can be canceled by pressing the Esc key.
Window Snapshot: Shift + Command + 4 + Space Bar
Want to take a screenshot of an individual window without any outside distractions? Pressing the Shift + Command + 4 key combo will bring up your mouse pointer, which is now represented by a camera icon. When you hit the Space Bar, you can click on any specific window and capture it as one clean snapshot! It’s so easy!
The Screenshot Menu: A Comprehensive Tool
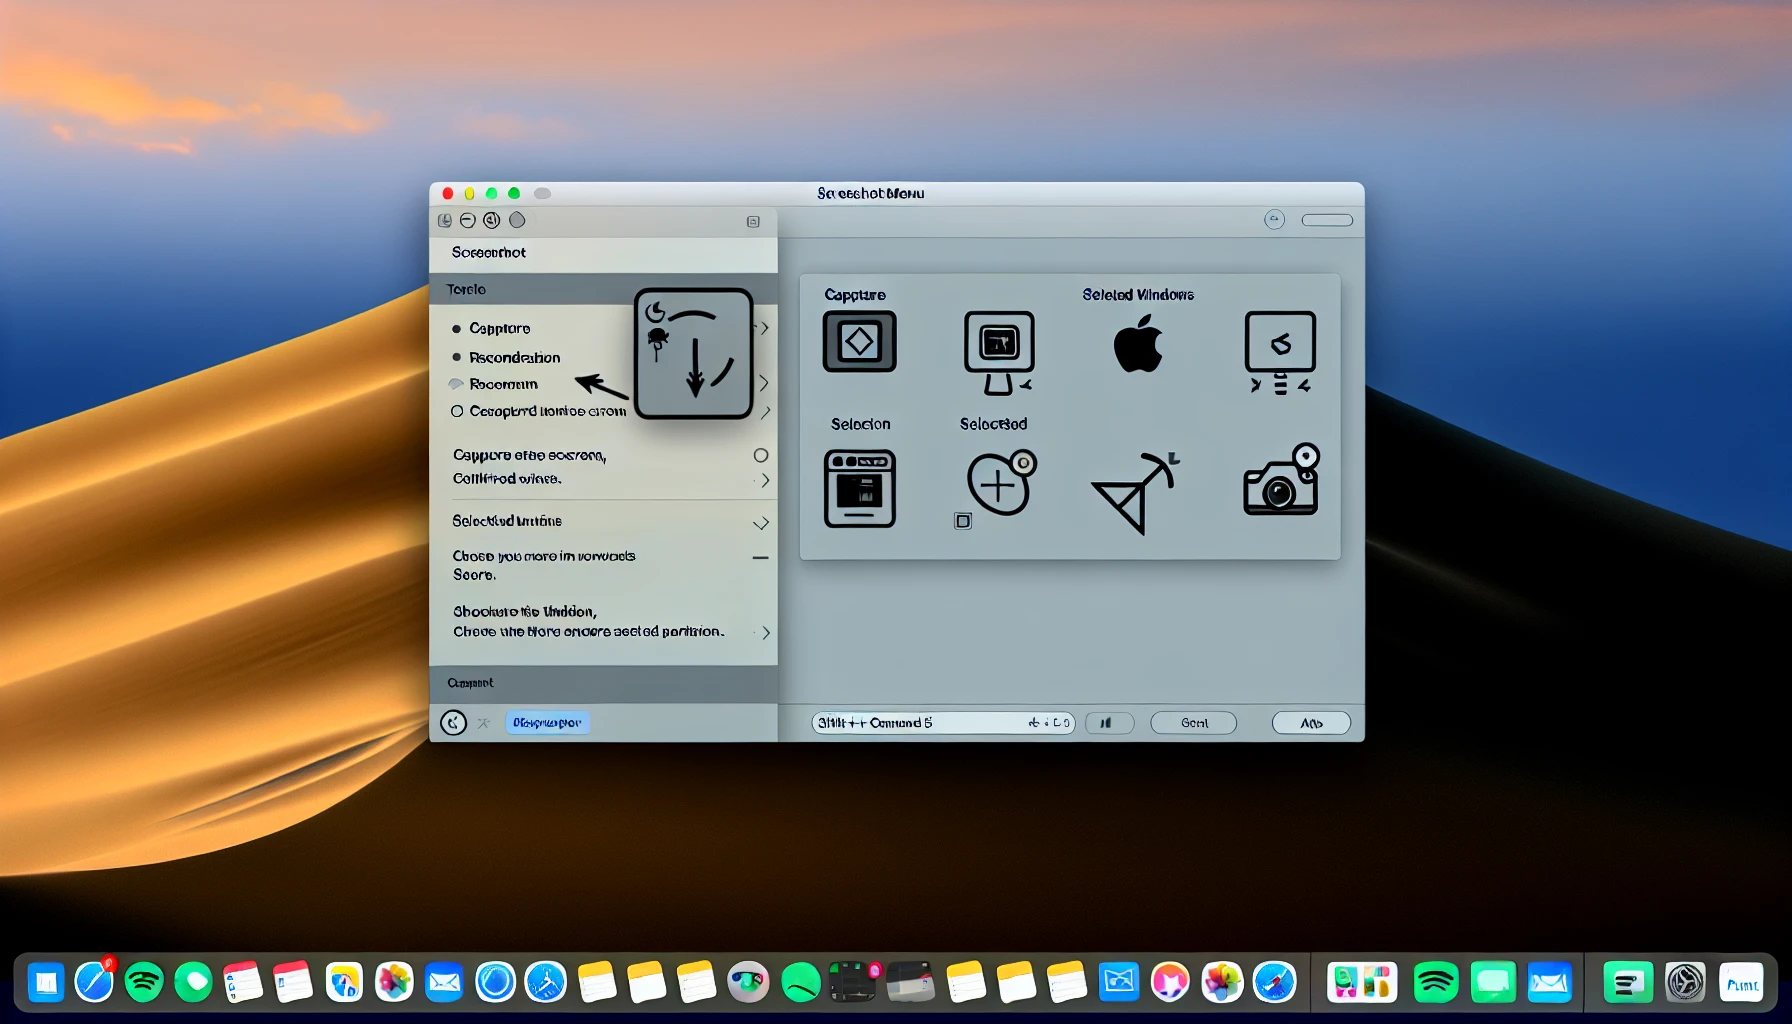
The screenshot menu on Mac, accessible with Shift + Command + 5, is an extensive tool offering various capture and video recording options. It can help you quickly take a screenshot or even record the whole screen for whatever purpose.
Accessing the Screenshot Menu: Shift + Command + 5
Simultaneously pressing the ‘Shift,’ ‘Command,’ and ‘Control’ keys and tapping the number 5 key bring up a screenshot menu. With just one click, you can easily take a shot of whatever is shown on your screen! Video recording options are available in this handy toolbox, allowing for capturing both entire screens and certain sections of it.
You no longer have to struggle juggling between several apps or shortcuts – everything needed for successful screenshots resides at these four fingertips!
Video Recording Features: Screen and Selection
The screenshot menu on Mac not only provides still images but also offers options for screen recordings. With this, you can capture or just a part of the display, giving you more control over what to include in your video documentation. It is efficient when creating demonstrations and tutorials and storing conversations held through video calls.
Touch Bar Captures: Specialized Screenshots

Those using a MacBook Pro featuring the Touch Bar have specialized screenshot choices, as this glass strip built into the keyboard offers quick access to tools and capabilities. Users can take advantage of all kinds of nifty screenshot options with just one touch of its multi-touch surface!
Taking a Touch Bar Screenshot: Shift + Command + 6
By simply pressing Shift + Command + 6, you can easily capture a screenshot of your Touch Bar and save it on the desktop. This is an efficient way to easily document and share what settings are available on this part of your device.
Advanced Tips for Perfect Mac Screenshots
Would you like to refine your Mac screenshot skills? Some tips and tactics can be employed to get the perfect screenshots for your particular needs. All it takes is some knowledge of Mac computers plus some know-how!
Utilizing the Floating Thumbnail Option

For Mac users, the show floating thumbnail option allows fast access to functions and settings for their screenshots. After taking a screenshot, you’ll find an image preview in one corner of your screen. From there, it is possible to open up an editing window, crop or annotate the picture, and share without resorting to another application using this convenient feature known as a ‘floating thumbnail.’
Customizing Screenshot Shortcuts
You can customize your Mac to fit your needs by adjusting the screenshot shortcut in System Preferences. To adjust, open Keyboard > Shortcuts and double-click on Screenshots. Then press and hold the key combination you want for that click keyboard command! Taking a few minutes to optimize these shortcuts can help improve workflow with more efficient use of keys while using this device.
Screenshot Storage and Management
Knowing the default save location of your Mac screenshots and how to rename, delete, and change them can make their management effortless. This article will explain all these topics, from setting a new storage directory for capturing images to removing old ones or renaming existing shots on a Mac device.
Default Save Location and Changing It
By pressing Command + Shift + 5 on Mac, you can select a preferred location for saving your screenshots instead of the default desktop. Select ‘Options’ and then choose where you'd like them stored in the “Save To” section. Your selected destination will now be their permanent home for all subsequent screenshot captures taken with this command.
Renaming and Deleting Screenshots
Renaming and deleting screenshots on Mac is a quick process. Double-click the filename to make it editable, enter your desired name, then hit Enter. Or right-click on the image for the “Move to Trash” option instead – simplifying how you manage all your screenshots!
Leveraging Third-Party Screenshot Tools
Using Mac tools can be sufficient. You should use an external screenshot tool for added functions and advanced features. This type of software will offer powerful advantages beyond the capabilities of default settings for taking screenshots with a Mac.
Popular Screenshot Apps
Are you looking to up your screenshot game on Mac? Lightshot, Monosnap, and Skitch are popular third-party applications offering powerful editing tools. With customizable settings and additional features, these apps will allow users to create perfect screenshots. To get the best out of it, experiment with different options until you find what works for you!
Editing and Annotating Screenshots
Capturing your Mac screen, editing it, and annotating the screenshots can make them look neat, clear, and professional. One can edit their screenshots with fantastic precision using either Preview (an in-built app) or more sophisticated external software.
Quick Markup with Preview
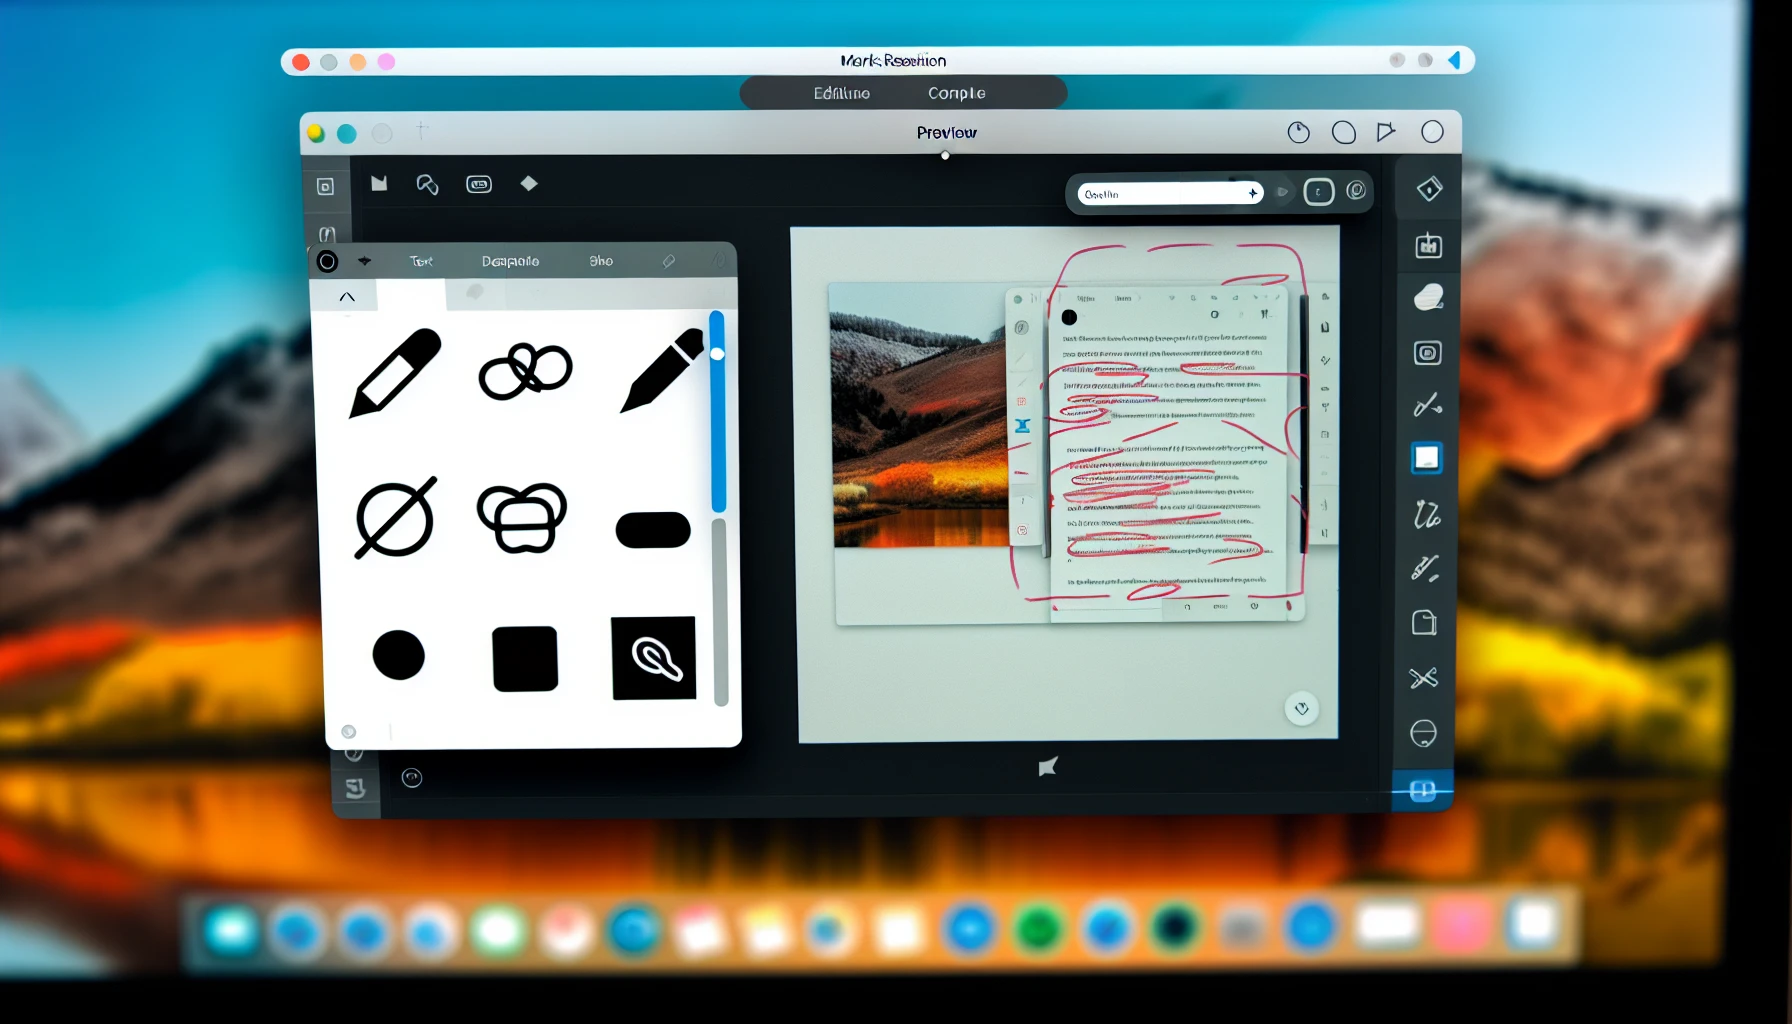
The Preview application that comes built-in to Mac can be used for quick editing and annotation of screenshots. It is a convenient tool that enables adding text, shapes, arrows, or highlights to guide viewers’ attention and give clear instructions.
All these features make it easy for users who need basic edits done quickly on their images without resorting to outside sources. This app offers simple yet effective tools for screenshot manipulation within an Apple device setting.
Advanced Editing with Third-Party Apps
Apps like CleanShot X and Xnapper are excellent for achieving more sophisticated effects with screenshots. These programs boast comprehensive editing tools and customizable options for creating sharp visuals that appear polished and professional.
Troubleshooting Common Screenshot Issues
Don’t worry if you encounter minor problems when taking screenshots on your Mac – we have helpful tips to help solve the issue. Taking regular screenshots can be achieved quickly with a few easy steps. Matters such as screen flickering or distorted images can occasionally occur due to a lack of memory space.
When Screenshots Don't Appear
If you’re struggling with Mac screenshots not displaying on the desktop, look at your screenshot menu preferences. To resolve the issue quickly and easily, try relaunching Finder by holding down Option while right-clicking its icon in the Dock or restarting your computer. These are potential methods to get back to capturing a screenshot from your screen without much trouble.
Enhancing Communication with Screenshots
Incorporating text, highlighting, and arrows into Mac screenshots can help clarify information being presented to the viewer. This technique creates precision in understanding what is displayed within the screenshot for transparent communication on a Mac device.
Annotating for Clarity
When you take screenshots of your Mac, you should include annotations that will guide the viewer and clarify key points. Annotations can improve how well a screenshot is understood and provide helpful information for creating tutorials or highlighting an issue to report on.
Summary
Gaining control of Mac screenshots is an essential skill that can simplify your work life, help communication flow better, and improve efficiency. This comprehensive guide has given you the necessary knowledge and utilities to utilize screen captures on your Apple device fully. Take what you’ve learned from this piece to record any screenshot confidently!
Frequently Asked Questions
How do I capture a screenshot?
To take a screenshot, simply hit ‘Print Screen’ (PrtSc) to grab an image of your whole screen and store it in the clipboard. An alternative shortcut is Alt + PrtScn, which lets you snap just the currently open window. Then press Ctrl + V to place it into any document or file.
Does Mac have a snipping tool?
Yes, Macs have their snipping tool built-in. You can access it by pressing Cmd + Shift + 5 to open the snipping tool panel and capture your entire screen or a portion of it. You can also try out third-party tools for more features like taking scrolling screenshots, annotating, editing, and sharing results.
Can I record my Mac screen using the built-in screenshot menu?
To capture the activity on your Mac’s screen, press Shift + F. Command + 5 to launch its built-in screenshot menu and then hit ‘Screen Recording’ from there.
What apps are recommended for advanced screenshot editing on Mac?
Screenshot editing on a Mac can be made much easier using Lightshot, Monosnap, and Skitch applications. All three provide advanced control over how images are manipulated after they’re run.
How can I annotate a Mac screenshot using the built-in Preview app?
In Preview, view the toolbar to access annotation tools for Mac screenshots. All you need do is open your screenshot image and select ‘Show Edit Toolbar’ from the View menu.